How to Propagate Lavender from Cuttings (Plants for Free)
This website is reader-supported - thank you! As an Amazon Associate I earn from qualifying purchases.
This thrifty step-by-step guide helps you create dozens of lavender plants for free. You begin by taking cuttings from a mature lavender plant, then encourage them to form roots. After six weeks, you could have enough young plants for a lavender hedge or to start a small lavender farm!

Buying a single lavender plant isn’t usually that expensive, but if you’d like to create larger plantings, then buying a dozen or more can be. Fortunately, you can propagate lavender from cuttings to create new plants for free. All you need is a mature lavender plant, a pot, free-draining potting mix, and a little bit of time.
The process involves snipping pieces from an existing plant and giving them the right environment to grow roots. Propagating lavender from cuttings is an easy garden project, and as long as you don’t take too much, you won’t harm the original plant. The small plants you’ll get from the process will be clones of the original and will produce the same foliage and flowers. That’s fantastic news if you have a more unusual lavender variety and want to create more of the same plant.
How to Grow Lavender From Cuttings
Not all plants grow from cuttings, but all types of lavender do. English lavender, lavandins, Spanish lavender, French lavender…you name it. The process involves taking cuttings during the growing season, planting them in a free-draining potting mix, and encouraging them to form roots. You do this by keeping them in a bright and warm place and not letting them or the potting mix go dry. It’s easy!

Lavender stems are filled with hormones that stimulate root formation when they’re planted in potting mix or soil. The level of growth hormones varies based on the stem’s age and the time of year, but generally, they’ll take root within six weeks. After that, you plant the new plants into their own pots, where you grow them to size before planting them in the open ground.
When to Propagate Lavender Cuttings
One of the most misunderstood aspects of taking lavender cuttings is when to do it. I think that it’s best to understand the why so that the when really clicks for you. Younger lavender stems, which are green, soft, and flexible, can take root far quicker than old wood that’s been around for a season or more. However, the younger the stem, the higher the chance it could wilt or rot while you’re trying to root it. It’s best not to use young, floppy growth to avoid this happening.

This new, fresh growth is called softwood, and by mid-summer, it begins to mature into semi-ripe wood, also called semi-hardwood. As the summer progresses, the wood matures further, and by the end of August, it transitions from softwood to semi-hardwood. All stages of lavender growth can be propagated, but for speedier rooting, it’s best to use older softwood and semi-hardwood.

July hits that sweet spot between softwood and semi-hardwood, making it the best time to take lavender cuttings. The new green growth has matured enough to be hardy yet still has high levels of root-stimulating hormones. However, if you’re in the northern hemisphere, you can take lavender cuttings using softwood from late June to early September. Rooted in summer, the cuttings will have a higher chance of forming roots and enough time to fill out before going into the dormant season.
Take Softwood Cuttings
The best lavender cuttings to take are long pieces of older softwood. For the best results, trim them to about four to six inches long before planting, taking this into account. Shorter stems can root, but have a much higher chance of not making it than if they were at least four inches long. The cuttings should also be pieces of growth that aren’t flowering. In summer, that means reaching into the middle of the plant and looking for newer growth at the base.

If you have an exceptionally long piece, consider cutting it into four-inch sections. That way, they’re small enough to fit in a pot and easier to keep alive. If you cut a piece into multiple pieces, remember which way was the top and which was the bottom of the branch. Cuttings won’t root if you plant them upside down.
Flowering Lavender Cuttings
As for flowering stems—yes, they can root. However, their natural processes and hormones have been focused on flowering rather than rooting. It can take a long time for flowering cuttings to take root, but it can be done. If the only material you have comes from a flowering stem, cut the flower and flower stem off first. Then, use rooting hormone powder or another hormone stimulant to encourage quicker rooting.
Use Free-Draining Potting Mix
Once you’ve taken and trimmed your lavender cuttings, you’ll need to plant them. A growing medium that will keep the plants moist enough without being so wet that the stems rot. That’s why gritty potting mix is usually called for. Gritty potting mix is light and free-draining, so it doesn’t hold excess moisture. In your hands, it should feel loose, light, and gritty, but it can be made from different materials.

You can either buy potting mix specially blended for cuttings or make your own. The mix shouldn’t contain any real soil; instead, it should be made with materials such as compost, potting mix, perlite, vermiculite, sand, or very fine stones.
As an ecological gardener, I try to use materials that aren’t damaging to the environment. That means avoiding peat moss, which you might also see recommended for cuttings. It’s easily replaced by sterile compost or multipurpose potting mix.
Potting Mix Blend for Cuttings
It’s easy to make a potting mix for cuttings. The recipe doesn’t have to be exact, and you don’t have to use the same materials that I do. I recommend using what you have on hand and what you can find inexpensively. Typically, you use a half-and-half mix of small-particle drainage material and multipurpose potting mix (or compost).

Drainage materials include horticultural grit (very fine gravel), sand, perlite, and/or vermiculite. Vermiculite absorbs water without making the overall potting mix wet. It holds moisture inside each small particle.

As far as a multipurpose potting mix is concerned, it’s a soilless, sterile medium typically made from coco coir, wood fiber, compost, and other ingredients. It’s best not to use garden compost in your mix because it may contain microbes and seeds that will interfere with your cuttings. On an aside, in the UK, potting mix is confusingly called ‘compost,’ even though only a portion of it is actually compost.

Another thing to avoid in your mix is soil. Garden soil, topsoil, etc. It tends to dry out and compact in pots, which isn’t ideal for young, developing roots. Soil from the garden also contains microbes that can cause root rot and damping off in cuttings.
Are Terracotta Pots Necessary?
The container you use to propagate lavender cuttings can be plastic or terracotta. Terracotta is best because it’s porous (which also makes it brilliant for DIY ollas) and allows air and moisture to flow through. If the terracotta appears wet on the outside, the potting mix inside is likely wet as well. If the pot looks dry, it’s likely absorbed much of the moisture from the mix and needs watering.

Terracotta pots pull moisture from the potting mix inside. To prevent the potting mix from drying out too quickly, soak the pots in water before planting them with cuttings.
You don’t have to use terracotta pots, though, so don’t feel that you need to rush out and buy them before propagating. Plastic pots work fine, but they retain more moisture, so you’ll need to be more vigilant to ensure the cuttings don’t rot from damp conditions.

When it comes to the pot(s) you choose, the pot’s size and depth do matter. It should be deep enough to bury at least half of the cutting and wide enough to hold three or more cuttings. Ideally, space them two inches (5 cm) apart around the rim of the pot.
Rooting Hormone for Propagation
Many people use rooting hormone when propagating lavender and other plants. It’s a white powder you dip cuttings in before planting, which stimulates them to take root. It’s a synthetic form of the hormone auxin. Lavender cuttings generally don’t need rooting hormone to take root, but it can help guarantee success.

Propagating Lavender with Honey
Other, more natural substances can help ensure your cuttings take root. One is honey, and the other is cinnamon, and they’re usually used separately. While neither of them actually stimulates rooting, they can help protect cuttings from microbes in the growing medium and give them a chance to form roots naturally. Both honey and cinnamon are antifungal, antibacterial, and antimicrobial. It doesn’t hurt at all to dip the cut end into them just before planting.
Can I Root Lavender Cuttings in Water?
If you’ve ever taken houseplant cuttings before, you’ll know that many will root in water alone. Though lavender cuttings can do, too, there’s a higher chance of the cuttings rotting. That’s why I usually propagate them using potting mix.
If you do try starting them off in water, make sure to change the water often so that it doesn’t scum up with algae and other organisms. This should help keep it clean enough to give the cuttings a chance. If you’re interested in trying, here’s how to propagate lavender in water.
Watering Cuttings
Though cuttings can rot if they’re too wet, they can wilt and dry out if the potting mix and air around them are too dry. That’s why it’s a good idea to put cuttings in a propagator or to put a clear plastic bag over the pot. The propagator lid and bag work in the same way, keeping the air inside more humid than the air outside. Humidity helps keep the aerial part of the cutting from dying.

It is also essential to keep the potting mix inside the pot just moist enough. If it’s too wet, it causes rot, but if it’s too dry, the cutting and its baby roots can shrivel up. As already discussed, it can be easier to tell if the mix is dry when using terracotta pots since they, too, dry out when the potting mix is dry. Still, it’s always a good idea to feel if it’s wet or dry with a finger.

To water pots filled with cuttings, it’s best not to water from the top. You have to remove the plastic bag (if using one), as it can disturb the developing roots. Instead, set the pot in a tray filled with water and let it sit for around fifteen minutes. The potting mix will wick moisture up during that time. Then take the pot out, drain it, and put it back where you’re keeping it.
More Plants to Propagate
If there’s one thing that we know as gardeners, it’s that buying plants can get expensive. Fortunately, many plants can be propagated from cuttings. Houseplant lovers are well-known for taking a little snip-snip of plants to grow on. Woody herbs, herbaceous perennials, and even vegetables can be propagated, too. Here are a few more ways to create plants for free:
- Propagate Tomatoes from Cuttings
- How to Propagate Rosemary
- Propagate Rose-Scented Geraniums
- Propagating Berry Bushes

How to Propagate Lavender
Equipment
- plastic or terracotta pots (4" /10 cm)
- gritty potting mix
- plastic bag
Materials
- 4 lavender cuttings
- rooting hormone optional
Instructions
Prepare Your Materials
- If you're using terracotta pots, soak them in water for half an hour before beginning. This hydrates the material and stops it from pulling moisture away from the potting mix later.
- Fill the pot(s) you're using with free-draining potting mix. A 1:1 ratio of drainage material (perlite, grit, sand, or vermiculite) to multipurpose potting mix is ideal.
Harvest Lavender Cuttings
- Take four or more lavender cuttings the day you plan to root them. If you can't pot them up immediately, put them in a sealed plastic bag to prevent them from drying out. Choose straight stems of softwood that are at least four to six inches long and without flower buds.


Prepare the Cuttings
- Using a sharp knife, cut the bottom of the cutting just below a leaf node. This is a place on the stem where leaves are growing. At this point, you can also trim the top growth if it's soft and bendy. Aim for cuttings that are 3-4 inches (8-10 cm) long.
- Using your fingers, gently remove at least half of the lower leaves on the cutting. Slide your fingers along the length, pulling all the leaves off as you go. Lavender cuttings only need about an inch of growth at the top to grow.


Plant the Lavender Cuttings
- Use a small dibber or pencil to poke holes where you want to place the cuttings in the potting mix. Make them along the outer rim of the pot and about two inches apart.
- Gently slide each cutting into a hole up to the green leaves. Firm the potting mix around it and when all the cuttings are in, water it in.
- Label the pot and put a clear plastic bag over it. The bag will keep the humidity inside high and help prevent the tender growth inside from wilting. It's best to secure the bag to the pot with a rubber band or string.

Grow the Cuttings
- Place the pot of lavender cuttings in a warm place with indirect light. Direct sunlight can cause the cuttings to wilt and die.
- Bottom water it every three days by setting the pot in a tray filled with water for about fifteen minutes. The potting mix inside will wick the moisture up through the pot's drainage holes. Allow the pot to drain, then put it back where you are growing it.
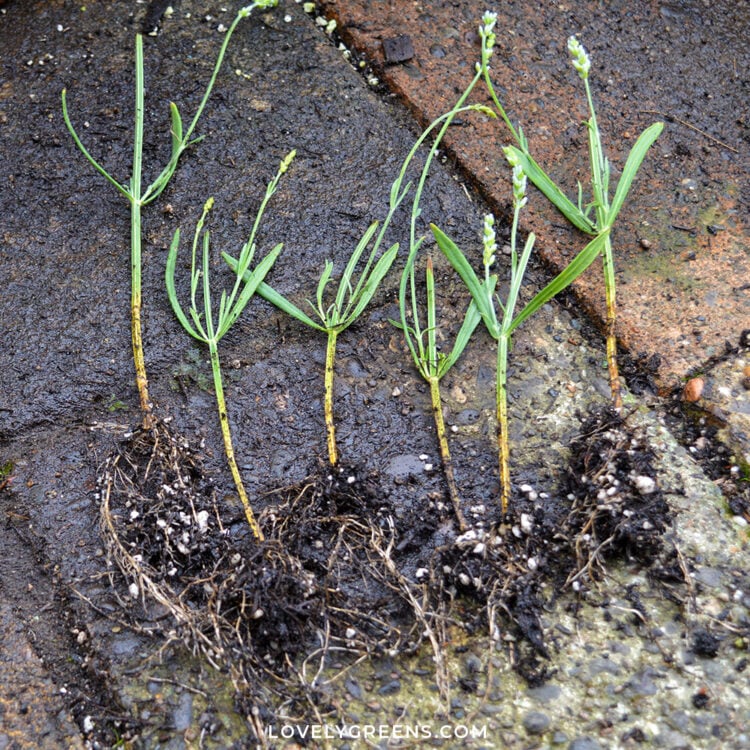
- Keep an eye on the cuttings, removing any that look dead or decaying. After about four to six weeks, you'll begin seeing tiny white roots come out of the drainage holes. This is a sign that your patience has paid off and the cuttings have taken.
- Take the young plants out of the pot and plant them in individual pots. Use free-draining potting mix, but it can have less drainage material than before. 1:3 drainage material to potting mix is great.

- Grow the young plants in these pots until the next spring, keeping them protected over winter inside a greenhouse or outside against the wall of your home. At that point, you can either transplant them into larger pots or plant them outside.


I have followed the instructions and they are wilty. Is this okay? It’s just been one day.
Hi Armenia, wilty isn’t a good sign. I’m guessing that the cuttings you took were of new, tender, green growth? Though new growth can root quickly and easily, it suffers if the temperature is too warm or the sun too bright. I tend to take semi-ripe cuttings in July instead for this very reason. They root a bit slower and there’s more success. To potentially save your current cuttings, take them out of the potting mix and place them in a glass of water in a place that is bright but out of direct sunlight. If they start growing roots in the water, fantastic! Let them grow until you see loads of roots. Then gently pot the plants up in the same type of potting mix described in this piece.
Thanks very much for your tips – I have a lovely lavender hedge along the side of our house that has been there ever since we moved in. It’s getting old and leggy now and I have been wondering how to replace or rejuvenate it if it dies. Taking cuttings sounds like a great idea of how to preserve it and replace it if I need to.
I just took lavender cuttings and I’m doing an experiment a bunch in water to root and a bunch in soil to see which does the best. I do not have a greenhouse turnover winter. How should I keep them till next spring to plant? Great article!
Do you have to poke holes in the plastic bag for the green house effect?
Thank you.
-Amber
No need to poke holes in the bag — you want it to be warmer for the cuttings.
I too had no idea that lavender could be propagated via stem cuttings. I had little luck my first time trying from seed, I willhave to try again and do some cuttings for the mean time. Thanks for the great read?
You’re welcome Natasha and best of luck with propagating. If you have any questions along the way just head back here and leave them as a comment :)
My friend accidentally chopped my french lavender bush while clearing brambles, very sad :( is there any way of saving it?
You can propagate from it immediately afterwards but if it’s more than a day old the chances of it rooting are slim. Hard to say how the plant will fare — it’s all dependent on how chopped it is.
Thanks so much for the clear descriptions! I just learned and practiced this for the first time today, so it was really great to read more about the principles that we were using.
As autumn is upon us and winter won’t be far behind, if I take my cuttings now, will they be okay to keep inside until spring planting in late May?
Yes they should do fine in a greenhouse — I’ve heard that others haven’t had luck with keeping them in the house.
Thanks a lot for sharing this with all people you actually
realize what you’re talking about! Bookmarked.
love all your info………….I love, love to experiment, and grow from what I have, I save most seeds, and allow things to develop seeds to plant for next year, be it flowers, lettuce, cantalope or whatever. This is a did you know,…if you run your fingers thru lavender, and then rub your hands on your arms, neck whatever, you will not have a mosquito bother you. It works every time, and you smell wonderful. I am just planting lavender again. Thru the years, I have lost mine, so I am anxious to get going again. Thanks for the propagation info..the best of summer times to you……..Marilyn
Fabulous tip Marilyn!
Love your ideas…thank you
You’re very welcome!
sweet as your angel face keep post such a lovely idea thanks again best of luck
Hello, Neat post. There is a problem along with your site in web explorer, may check this?
IE nonetheless is the marketplace chief and a large component
of other people will omit your great writing because of this problem.
Thanks for the heads up!
Hello all. I grow all types of lavender. We live on the side of a mountain (Mt. Bernard), and the soil is granitic, in its composition ( fine granite particles). Every type of tree, bush and flower seems to grow well in it.
Plants/ trees etc. planted in it, don’t seem to need alot of water or watering once established. It’s great for propergation…
Enjoy your lavender plants…they are like cats…very forgiving, like each others company, and tolerate minimal intervention by humans… ( plant in minimums of three ( same type), or mass plant for effect ” magnicicent ” ) ?
Fabulous tip Palmanne :)
I grow a lot of lavender this way for our farm,( I think this post is how I first found you!) Not to knock root hormone but honey works just as well!!!
Do you dip the end in honey just as you would root hormones? How does it work?
The price of honey these days it’s probably cheaper to buy root hormone.
If you put some willow switches in a bucket of water to root you can also use that willow water as a rooting agent as willows produce their own root hormone. Just use the willow water to water you plant.
Blessings from North Idaho, TeresaSue
I didn’t know that you can grow lavenders from cuttings. Honestly, growing them from seeds takes forever and I’m feeling hopeless. I hope at least one of my lavender seeds will sprout soon. I water them daily just enough to keep them moist and they get sunlight everyday too.
Hi, I just sowed some lavender seeds about 2 weeks ago. The seeds sprouted after 4 days, and growth was quite fast in the first week. But after that, the seedlings seem to have stopped growing. They are still quite fragile looking. What should I do to aid their growth?
Just make sure you keep them watered and cover to keep from freezing if you are in a zone that gets below freezing temps. I sprouted some two years ago from seed and they did the same thing. but then in spring they seemed to take off. Now they are quite large and I am going to take some cuttings and try to propagate as well. they will bloom after the second warm season and also have a good growth spurt. You must have patience with lavender. Mine were small for the first year. I just babied them along with water and kept them covered with jars and leaf mulch in the winter months. Good Luck with your new sprouts and Happy Growing!!!
Hi Tanya,
I was looking for information about Lavender seedlings when I came across this article. Thanks for sharing :)
I've just moved to Australia from a tropical country, and am very happy that I can finally plant my own lavender. I started a big batch from seeds and the seedlings are now growing along fine.
I'm wondering if you could tell me, how closely you plant the Lavender seedlings in pots? Most seed packets said 20cm in between, but I don't have a lot of space in my balcony.
Thanks in advance
What books on propagating do you recommend? I couldn't find them on your blog side bar. Thanks.
The one book I own is called Propagating Plants from the Royal Horticultural Society. It really has everything you need to know to get started!
Hi, I purchased 3 plants last year from the HomeDepot and the plants have grown nicely. I want to grow about 22 new plants from the 3 older ones. I live in Los Angeles County, CA and I believe it is zone 9 and it is early April. I am going to follow your directions. Is there any special plant food or anything special I need to do? Any advice is appreciated. Thank you, Arthur.
Well drained compost and rooting hormone are pretty much all you need at the propagation stage. More nutrient rich compost comes into play when you have the root systems established. Good luck with growing your 20+ new plants – you'll easily be able to achieve it with three mature plants.
I live in montreal, Canada.. where we are almost into April and we are still barely getting out of sub-zero temperatures. Our summers are ridiculously tropical however… 34-35 Celsius is standard summer temperature and my front lawn becomes a desert where Lavender and cactus thrive. It seems my back yard where I fuss over the vegetable garden was the wrong place for it. If given good nutrients in the soil, sun, heat, more sun and the odd water at night (allowed to dry well between waterings) it will love you back!
Hi Tania,
I love lavender too and this year bought (easy way) 72 lavender munstead (dwarf variety) that arrived yesterday in modules. I have no idea what to do with them now! I want them to line the box hedge in my front garden eventually but currently they are so small – when can I plant them out and do I keep them in the little plastic containers they arrived it until then? Do I water them and keep them indoors until they are bigger or should I repot them? I have no idea! I hope you can help.
Thank you so much in advance!
Deborah x
Apologies for responding so late to your comment Deborah. You'll want to move your plantlings into larger pots to grow on for a bit before planting them out in their final positions. Personally, I'd wait until the plants have an established root system in at least a 4" pot before planting out.
Thank you so much for the information on propogation. I have a couple of lavender plants that keep the bees and butterflies busy; this sounds like a fun way to grow the party :-)
Beth
I was wondering if you cold treated the seed before sowing and for how long? Lovely site!
diannagardens.blogspot.com
Thanks Dianna :) And no, I didn't cold treat the seeds since the directions on the packet didn't mention it – which means they probably are old enough that they wouldn't need it to break dormancy. Though if you're collecting fresh seeds, it would probably be a good idea to stratify them if you want to sow them right away.
A friend actually dug her lavender up an divided like any other perennial. I'm not brave enough to sacrifice my babied lavender yet. Lol.but I have found new off spring coming up near them and replanted those. I might try the cuttings in the spring too.
Lavender plants can only be divided once they are three or more years older. Even so, I'd be hesitant to do mine too!
Thanks for the detailed instruction on propagating lavender! Mine died this year and just bought a healthy pot for me to plant. I guess it's too late to propagate now but now that I know how, I'll be sure to do this next spring. I didn't take care of my old one – hence, its demise this year. The winter was brutal and I didn't cut them back – was scared to touch it – and the couple of main barks that survived eventually dried out.
I'm off to search to see if you have any tips on cutting them back so my new pot will be healthier.
Thanks again!
Hi Karen, in this post I propagated lavender from semi-ripe cuttings taken in late summer (even though the post is from early spring) so don't feel like you have to wait a full year before trying.
Regarding pruning: only cut new wood when pruning. If you cut the older branches back you can kill the plant. Instead, if you think the plant is looking 'Leggy' (bare branches at the base of the plant) then try sprinkling a quarter cup of garden lime on top of the soil in the pot. Lavender isn't fond of acidic soil so could be one of the reasons your plant isn't doing too well. Other reasons it might not be doing well is that lavender needs full sun and plenty of drainage – does your pot have gravel in it's bottom (an inch or two will do) and have plenty of holes at the base for water to drain out?
If you love lavender, come to Sequim, Washington. It is the lavender capital in the US. We have a festival every year where you tour lavender fields. They sell everything lavender, culinary included. It was just held 2 weeks ago, but plan on next year. Look up on the web Sequin lavender festival to see the beautiful farms and fields. The whole town is bursting in flowers, including every street light, just magnificant to see and smell.
Thanks for the article. I put a lavender plant in last year and it did alright but it's not here now. Does lavender usually come back the next year or do you have to re plant every year?
Hi Brian, Lavender is a perennial so if you can't see it now then it's not likely to come back. Sorry for the bad news!
What is the most fragrant type of lavender. I've planted some lavender but never had any that was really fragrant.
I don't know of any Lavender that isn't fragrant…you sure it was lavender that you planted?
It might have been russian sage. Did it smell like sage?
Russian sage has a very fragrant smell, same as lavender. What you may have planted was salvia. I dont believe that is very fragrant. But it kinda looks like lavender.
Good info. I want to make wedding favors out of lavender plants.
What a lovely and fragrant way to dress up your wedding dinner table. Clever idea :)
It's so easy to grow lavender from cuttings. Mine in the garden is so prolific though I have never had to do this.
You can use the same propagation technique with other plants so it might come in handy :)
I take a few cuttings every year from my lavender bushes – in my book you can never have enough lavender.
I agree Elaine…it's such a fantastic shrub :)
Another fan of lavender here :) I have some bushes outside the kitchen door so the fragrance can waft in. Traditionally I should drape my freshly laundered tea towels on it to dry :)
I have never grown from seed, but I do propagate, and this is a great article.
I'm guessing that your cuttings will sell well at the Farmer's Market ;)
What a fabulous idea! I'm stealing that laundry idea from you Mo. Naturally scented washing :)
Oh and I doubt I'll have any leftover for the market but we'll see. I'm planting a hedge of lavender at the allotment and at home :)
I smiled when I read this Tanya. When we lived in Lichfield many years ago, the man next door had a front garden full of lavender bushes, which he treated like his children – really looking after them well. They used to seed all over the place – the cul de sac we lived in had them growing out of cracks in the kerb, gutters etc. I tried growing some from cuttings and they never came to anything!
What a wonderful street to live on…the smell must have been amazing!
You should try again with your cuttings Pat – second or third times a try :)
I too love lavender and have been investigating all the different types after hearing about a lavender garden on GQT/Radio 4. Last year I grew some from seed but only four survived, think that was me though not being a good enough mum! xxx
They do take a long time to grow from seed so you can be forgiven for moving on to other projects Fran :) If you're interested, try growing them from cuttings for more quicker effect.
The lavender garden sounds lovely…where about is it?